Making HTML Input Controls Truly ReadOnly: Best Practices and Workarounds
Rick Strahl offers practical solutions for improving HTML readonly input controls, providing tips on CSS, tabindex, and UI design trade-offs for web developers.
Making HTML Input Controls Truly ReadOnly: Best Practices and Workarounds
By Rick Strahl
HTML provides both readonly and disabled attributes for input elements, each with distinct behaviors that impact user experience and form handling. In this article, Rick Strahl discusses the issues developers encounter when trying to create truly readonly fields and offers pragmatic advice for making readonly controls behave closer to what users expect.
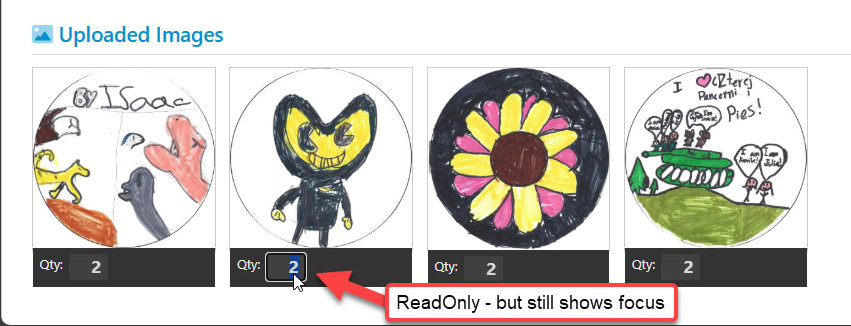
Why ‘readonly’ May Not Be Enough
readonlyinputs display minimal style differences by default but can still receive focus and be selectable via mouse or keyboard.- Users may mistake a readonly control for something editable due to the focus rectangle and enabled UI.
Example:
<input type="text" readonly class="image-quantity" />
Frameworks like Bootstrap add some styling, but they don’t change the fundamental UX: readonly controls still act like editable fields (except you can’t modify values).
disabled vs. readonly
- disabled: Input cannot be accessed/focused and is not submitted with the form.
- readonly: Input can’t be modified but can be focused; its value is submitted with the form.
Reference: MDN Documentation
In most practical cases, disabled is preferable unless you need to post the value. Only use readonly if server submission is required.
Fixing ReadOnly UI with CSS and tabindex
If you must use readonly, CSS and tabindex help you mimic disabled control UX:
.image-quantity[readonly] {
  border: none;
  opacity: 0.7;
  pointer-events: none;
}
- Visually reduces emphasis (opacity)
- Disables mouse UI activation (pointer-events)
Prevent keyboard tab focus:
<input type="text" readonly tabindex="-1" class="image-quantity" />
tabindex="-1"removes the control from tab order
For generic use:
input[readonly], textarea[readonly] {
  opacity: 0.7;
  pointer-events: none;
}
Note: readonly only applies to text inputs and textareas.
Client-Side Frameworks and Razor Usage
The article demonstrates integrating these patterns in Vue.js and Razor TagHelpers:
Vue.js Example:
<input v-model="image.quantity" v-on:change="updateQuantity(image)"
  v-bind:readonly="isReadOnly"
  v-bind:tabindex="isReadOnly ? -1 : auto"
  class="number image-quantity" />
Razor TagHelper Example:
<input type="number"
  asp-for="Fundraiser.EstimatedPlates"
  readonly="@(fundraiser.Status != FundraiserStatus.None)" />
Accessibility Considerations
Community comments highlight accessibility questions:
- Screen readers may treat readonly and disabled differently.
- For WCAG compliance, ensure the HTML matches semantic intent and test UI for all users (keyboard, screen reader, mouse, etc).
Summary & Recommendations
- Prefer
disabledunless you require form submission. - When using
readonly, enhance UI with CSS and tabindex for a better experience. - Always consider accessibility when changing native control behavior.
Resources
Discussion and examples adapted from Rick Strahl’s original article, community comments included for additional context.
This post appeared first on “Rick Strahl’s Blog”. Read the entire article here