Implement Role-Based Authorization With Keycloak, Web API, and Blazor WebAssembly
Marinko Spasojević guides readers through implementing role-based authorization using Keycloak with Blazor WebAssembly and Web API, exploring role assignment, claims mapping, and securing both UI and API endpoints in modern .NET applications.
Implement Role-Based Authorization With Keycloak, Web API, and Blazor WebAssembly
Author: Marinko Spasojević
Source: Code Maze
Updated: Feb 27, 2025
Introduction
This guide builds upon previous work by demonstrating how to implement role-based authorization (RBAC) using Keycloak for identity management, Blazor WebAssembly for the frontend, and ASP.NET Core Web API for the backend. Assigning roles to users allows for fine-grained access control, enhancing security and enabling tailored user management.
Prerequisites
If you haven’t read the previous article on Keycloak authentication with ASP.NET Core Web API and Blazor WebAssembly, it is recommended for better context. The article assumes you already have a working Keycloak realm, user, and a basic integration with Blazor WASM and Web API.
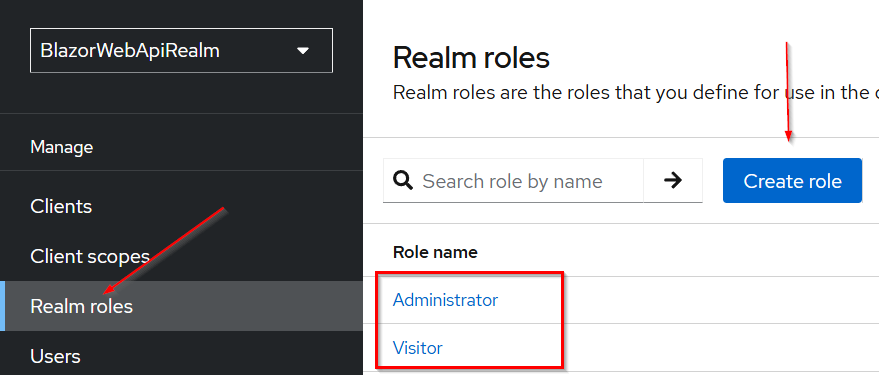
Step 1: Creating and Assigning Roles in Keycloak
- Navigate to your Keycloak admin console.
- Select the
BlazorWebApiRealmrealm. - Under the “Realm roles” menu, create roles:
AdministratorVisitor
- Assign these roles to users as needed:
- Go to the Users menu, select a user.
- Under the Role mapping tab, assign roles (e.g., assign
Administratorto your admin user).
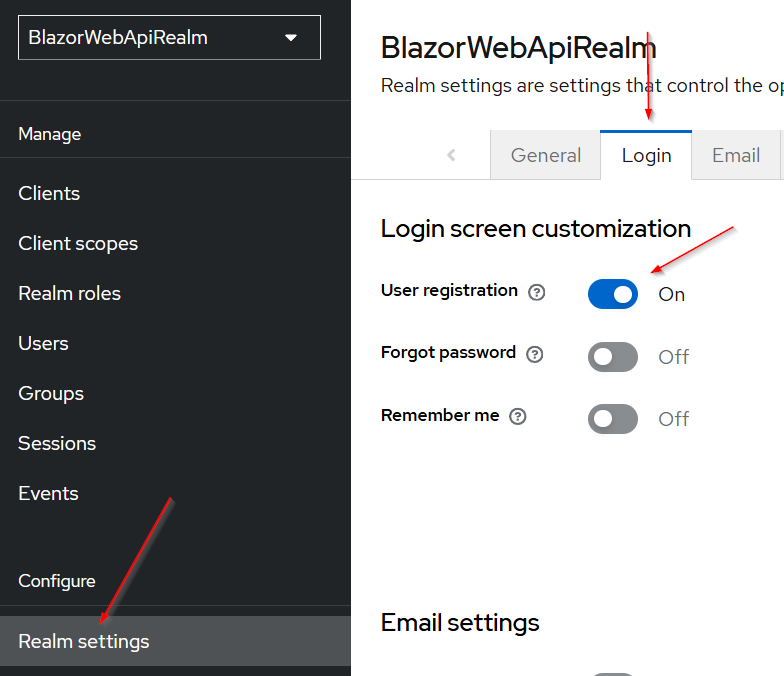
Step 2: Enable Automatic Role Assignment During Registration
- Go to Realm settings > Login and enable User registration.
- In the User registration tab, set a default role (e.g.,
Visitor) for all newly registered users. - This streamlines onboarding for visitors or users with non-admin privileges.
Step 3: Test Roles With Blazor WASM
- Run your Blazor application.
- Register a new user (e.g.,
CodeMazeVisitor). - Log in and inspect the OIDC token via browser dev tools; the access token should include a
realm_accesssection listing user roles.
"realm_access": {
   "roles": [
      "default-roles-blazorwebapirealm", "offline_access", "uma_authorization", "Visitor" ]
}
However, for better compatibility with Blazor and .NET, a role claim mapping is preferred.
Step 4: Map Roles in Keycloak for Blazor WASM
- In Keycloak, under Client Scopes, locate the
rolesscope. - Go to the Mappers tab, select
realm rolesmapper, and change settings:- Token Claim Name:
role(Blazor expectsrole, notroles) - Add to ID Token: Yes
- Add to Access Token and Multivalued: Already set to Yes
- Add to UserInfo: Yes
- Token Claim Name:
This ensures roles are properly mapped to the OIDC token for client-side processing.
Step 5: Update OIDC Configuration in Blazor Program Class
In your Blazor WASM Program class, configure OIDC authentication to use the role claim:
builder.Services.AddOidcAuthentication(options => {
    options.ProviderOptions.Authority = "http://localhost:8080/realms/BlazorWebApiRealm";
    options.ProviderOptions.ClientId = "blazor-client";
    options.ProviderOptions.ResponseType = "code";
    options.ProviderOptions.DefaultScopes.Add("blazor_api_scope");
    options.UserOptions.RoleClaim = "role";
});
Now, after logging in, examining the token should show:
"role": [
  "default-roles-blazorwebapirealm", "offline_access", "uma_authorization", "Visitor"
]
Roles are present as an array of strings.
Step 6: Protect Blazor Components and API Endpoints by Role
To restrict access to a page (e.g., Weather), add an Authorize attribute:
@page "/weather"
@inject HttpClient Http
@using Microsoft.AspNetCore.Authorization
@attribute [Authorize(Roles = "Administrator")]
To hide navigation links from non-admin users in the navigation menu:
<AuthorizeView Roles="Administrator">
  <div class="nav-item px-3">
    <NavLink class="nav-link" href="weather">
      <span class="bi bi-list-nested-nav-menu" aria-hidden="true"></span>
      Weather
    </NavLink>
  </div>
</AuthorizeView>
Step 7: Handle Array-Based Role Claims in Blazor
.NET expects each role as a separate claim. Keycloak provides all roles in one claim as an array. To bridge this, create a factory that splits array claims:
public class MultipleRoleClaimsPrincipalFactory<TAccount> : AccountClaimsPrincipalFactory<TAccount> where TAccount : RemoteUserAccount {
    public MultipleRoleClaimsPrincipalFactory(IAccessTokenProviderAccessor accessor) : base(accessor) { }

    public async override ValueTask<ClaimsPrincipal> CreateUserAsync(TAccount account, RemoteAuthenticationUserOptions options) {
        var user = await base.CreateUserAsync(account, options);
        var claimsIdentity = (ClaimsIdentity)user.Identity;
        if (account != null) {
            MapArrayClaimsToMultipleSeparateClaims(account, claimsIdentity);
        }
        return user;
    }

    private static void MapArrayClaimsToMultipleSeparateClaims(TAccount account, ClaimsIdentity claimsIdentity) {
        foreach (var prop in account.AdditionalProperties) {
            var key = prop.Key;
            var value = prop.Value;
            if (value != null && (value is JsonElement element && element.ValueKind == JsonValueKind.Array)) {
                claimsIdentity.RemoveClaim(claimsIdentity.FindFirst(prop.Key));
                var claims = element.EnumerateArray().Select(x => new Claim(prop.Key, x.ToString()));
                claimsIdentity.AddClaims(claims);
            }
        }
    }
}
Register this in the Blazor program configuration:
builder.Services.AddOidcAuthentication(options => {
    options.ProviderOptions.Authority = "http://localhost:8080/realms/BlazorWebApiRealm";
    options.ProviderOptions.ClientId = "blazor-client-test";
    options.ProviderOptions.ResponseType = "code";
    options.ProviderOptions.DefaultScopes.Add("blazor_api_scope");
    options.UserOptions.RoleClaim = "role";
}).AddAccountClaimsPrincipalFactory<MultipleRoleClaimsPrincipalFactory<RemoteUserAccount>>();
This transformation allows Blazor and .NET authorization mechanisms to enforce policies as expected.
Step 8: Secure API Endpoints
To restrict API access based on roles, use the Authorize attribute in your controller:
[HttpGet]
[Authorize(Roles = "Administrator")]
public IEnumerable<WeatherForecast> Get() { ... }
Only users with the Administrator role will have access.
Conclusion
By mapping roles correctly and transforming claim arrays, role-based authorization with Keycloak, Blazor WebAssembly, and Web API is robust and manageable. This enables practical RBAC enforcement for both UI and backend, improving security and maintainability in your .NET applications.
For more in-depth coverage, visit the original article at Code Maze.
This post appeared first on “Code Maze Blog”. Read the entire article here